Assembling Blankets
Many volunteers prefer to assemble blankets and distribute them in their own community, which we always encourage. Following are tips for assembling and joining sections into completed blankets.
Please note: No items sent by or on behalf of WUA!, including blankets assembled using 7"x9" sections, should be sold, auctioned, or donated to resale organizations without explicit written consent from WUA!
Afghan Assembly Tips & Stitches
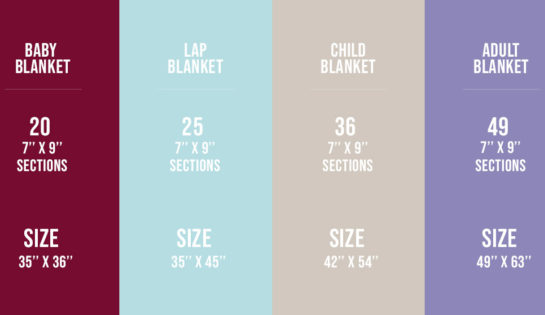
If you have an interest in making an entire afghan, you can knit or crochet your afghan to any size or pattern you wish. There is a need, for instance, for baby afghans and lap throws (see Afghan Assembly Chart for suggested sizes), which are much smaller than the standard Warm Up America! afghan. If you want to make several sections, but not an entire afghan, consider knitting or crocheting a 7" by 63" strip (Diagram A). It makes assembling much easier and less time consuming.
When assembling individual sections into a finished afghan, lay out all of the sections on a table or the floor to determine the final arrangement by color and/or texture. It’s easiest if you join sections into long strips first (Diagram A), then join the long strips together to complete the blanket. Following are several joining methods.
Also remember that while sections are supposed to be 7" by 9", everyone's tension is a little different and several brands of yarns have been used, so the size of the blocks will vary. Therefore, it may be necessary to "stretch" some blocks and "ease in" others when assembling.
There are several ways to join knitted and crocheted sections. The overcast or whip stitch (Diagram 109A, pg 53 of Knit CIP manual--Rename Diagram B) is the easiest, though it’s not always the sturdiest or most attractive if the stitches are too far apart. Alternatives to consider are mattress and backstitch which like the overcast stitch use a yarn or tapestry need or slip stitch, which requires a crochet hook.
MATTRESS STITCH
With right sides facing you, place edges to be seamed together (Diagram 106-Knitting; Diagram 82-Crochet). Beginning at hem edge, secure yarn through both sides. With needle pointing up, pick up the bar or post depending on whether you are joining knitted or crocheted sections between first and second stitches on right-hand side. Cross to opposite side, pick up bar/post, return to right hand side. Put needle into same space it came from and pick up bar/post. Continue in this manner until four or five stitches have been made. Be sure to match rows. Tighten yarn until it holds seam firmly. Continue stitching picking up every row bar or post until seam is finished.
BACK STITCH
This stitch is a good firm stitch for seams that get heavy wear. Place pieces with right sides together. Secure yarn on the edge of the work. Working one stitch in from vertical edge, insert needle from back to front at A, pull yarn through. Insert needle from front to back at B, then from back to front at C; pull yarn through (Diagram 107 Knit; Diagram 83-Crochet). Continue working in this manner across.
SLIP STITCH
To start, make a slip knot on yarn end. With right sides together, insert hook under both bound off edges, catching the slip knot and pull through work. Insert hook under the next stitches, yarn over and pull through all loops on hook. Continue until seam is complete, being very careful to make stitches loose enough so that the seam has the same amount of give as the pieces you are joining. This leaves no edge showing on the right side (Diagram 108-Knit; Diagram 85-Crochet). Slip stitch may be worked under the innermost or two outermost loops of both pieces for a different appearance.
FINISHING HINTS
Finally, if you have an experienced sewer among your friends or group, they might be able to zig-zag the seams together on their sewing machine using a large-size stitch and a neutral or transparent thread but it’s tricky! Regardless of the joining stitch you decide to use, remember not to pull the working yarn too tightly. Seams should have some elasticity. And keep your stitch line close to the edge so that you do not create a thick, bulky seam. Depending on what squares wind up on the outside edge of the afghan, some edges, such as those worked in stockinette stitch, have a tendency to curl. It might be helpful to work a row or two rows of single crochet around the joined squares to give an attractive finished.

DONATE
We need your financial support to build our charity network. Help us to ship, deliver and create more warm blankets and clothing for people less fortunate than ourselves.
MAKE
Volunteers can donate their time to crochet and knit one or more 7" by 9" sections, as well as entire blankets and accessories. Sections are either joined by individuals or groups in a community.
Mail items to:
3740 N Josey Ln Suite #126, Carrollton, TX 75007